
Í pósti dagsins er DIY jólasería, sem er frá gamalli færslu, en tessi er einföld og skemmtileg sem gaman er ad útfæra.

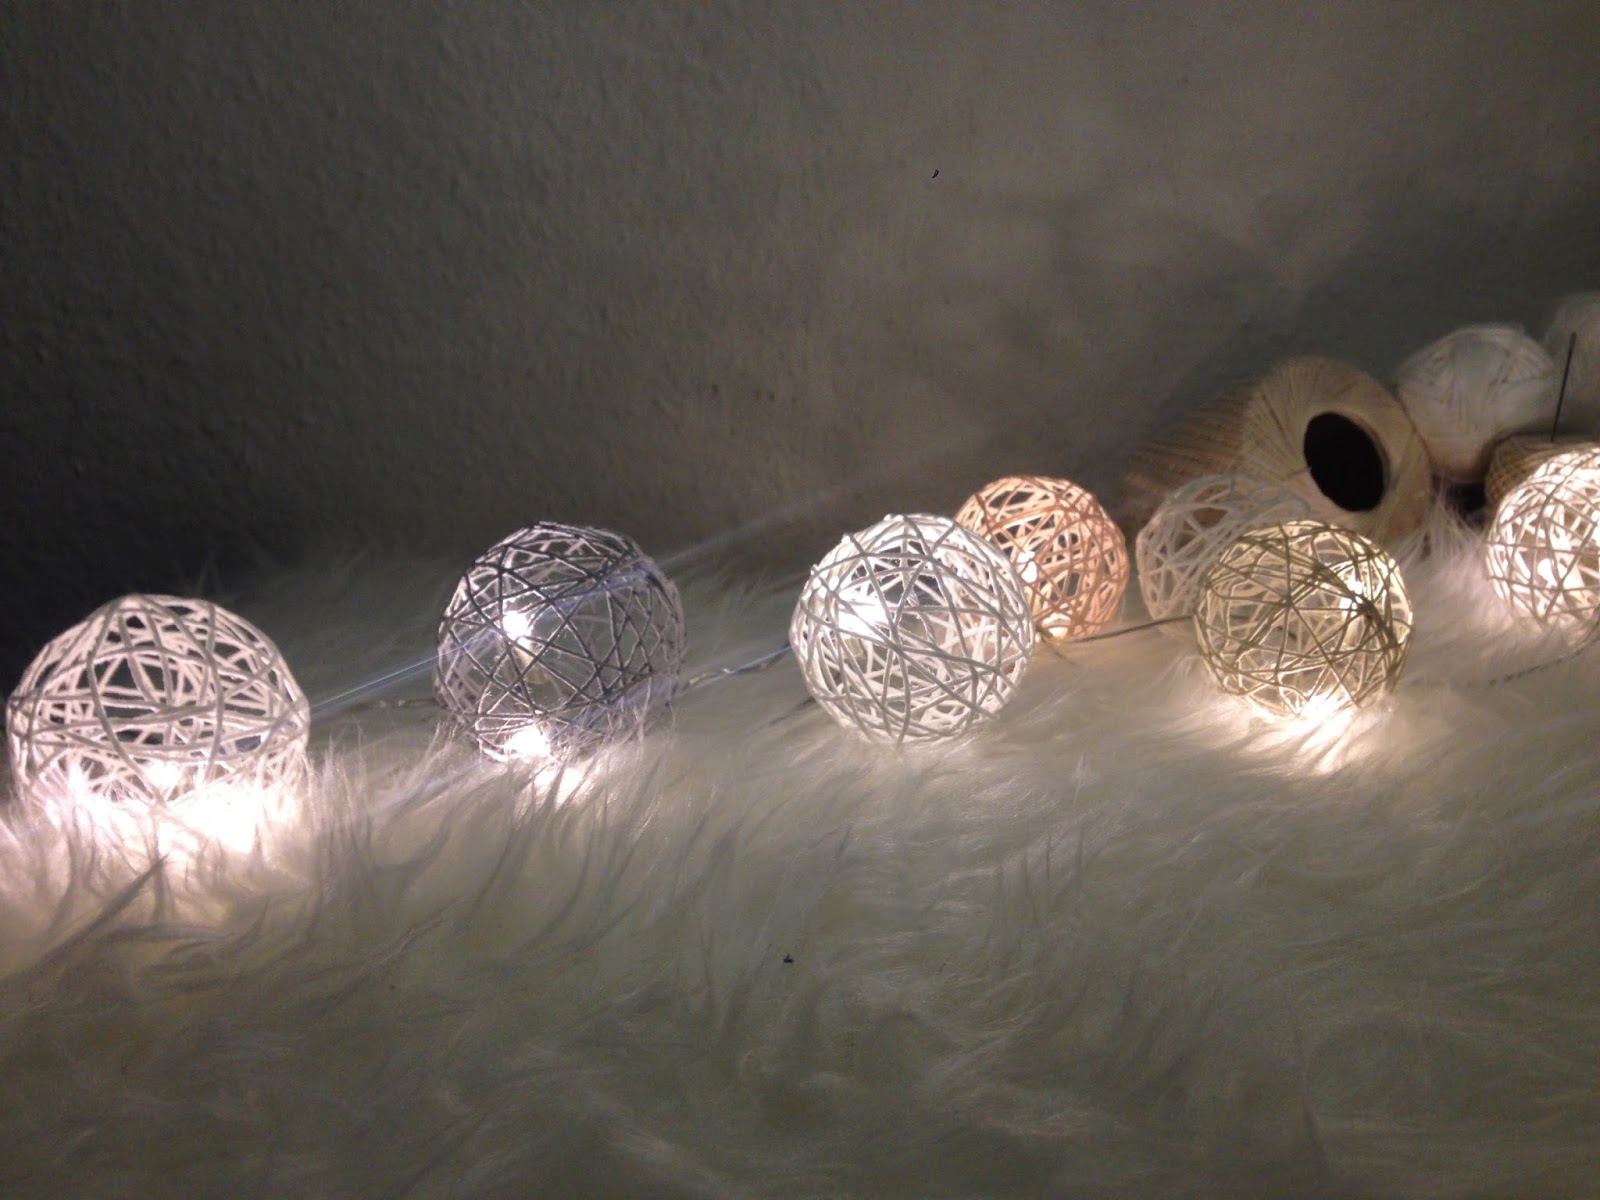
Ég er algjört jólabarn og mér finnst ótrúlega gaman ad föndra og dúlla mér sérstaklega í kringum jólahátídirnar. Ég fann fallega útfærslu á jólakúlum eda "snjóboltum" á pinterest (kemur á óvart..) en ég ákvad ad búa til skraut-ljósaseríu úr boltunum í stadinn fyrir jólaskraut.
Kúlurnar er hægt ad gera á mismunandi vegu, en eins og ég gerdi med heklada kúluljósid, tá tarf ad stífa garnid. Ad tessu sinni átti ég veggfódurslím, frá ödru verkefni sem ég set inn sídar, en ég vildi nýta afganginn og ákvad tví ad purfa ad stífa med tví.
Veggfódurslímid var í duftformi, svo tad tarf bara ad blanda vatni saman vid og tú rædur tví nokkurnveginn tykktinni. Límid geymist í sirka 10 daga eftir blöndun svo tad er hægt ad gera ýmislegt ef tid eigid afgang. Ég mæli med pinterest ef hugmyndaflugid er ekki nógu öflugt.
........................
I love Christmas and I really enjoy the time around the Christmas holidays, I love crafting and making my own decorations and this year I found a beautiful version of Christmas ornaments, "Snow-balls" which I decided to change into an all-year-round home decoration lighting.
You can make these in different ways, but as I did with my crochet light, you need to stiffen the yarn. I had some leftover wallpaper glue that I wanted to use, so I tried that for now, and it worked amazingly. Wallpaper glue is often in a powder form, that you blend with water and it holds for about 10 days. You can do different things with wall-paper glue, so if you have leftovers i recommend Pinterest to check on ideas.

(myndir af upprunalegu hugmyndinni/ photo tutorial from the original idea)
Ég notadi/ I used:
-Bómullargarn/Cotton yarn: Søstrene Grene
-Veggfódurslím/Wallpaper glue: Bauhaus
-Vatnsblödrur/Water balloons: Tiger
-Glær LED-sería/Led lights: IKEA/Gardheimar/A4
Ég ákvad ad nota nokkra liti í mína seríu, tví mig langadi ekki ad hafa hana alveg hvíta. Ég er mjög hrifin af gráu og bleiku saman, og notadi tví fölbleikan og ljósgráan, ásamt hvítum og kremudum lit. Útkoman var ædi og ég er ekkert smá sátt.
...............................
I used a few colors in mine, because i didnt want it to be all white. I love grey and pink together, so I used pale pink and light grey, with some white and beige color. The result is beautiful and I am so happy.
Adferd:
Adferdin er audveld, og útskýrist svolítid á myndunum fyrir ofan. Byrjid á ad finna til límid, garnid, skæri og blása upp vatnsblödrur. Ég sirkadi út lengd á bandi fyrst fyrir eina kúlu, og klippti svo nokkra eins í mismunandi litum sem voru tá tilbúnir fyrir næstu blödrur. Gott er ad nota einnota plasthanska vid tetta verkefni, en ef notad er veggfódurslím, tá er tad audtrifanlegt med sápu. Ég bleytti vel upp í hverjum spotta og dró hann svo jafnódum upp úr límdollunni og vafdi óreglulega utan um blödruna, passa ad tad sé frekar tétt, og ekki of stór göt inn á milli. Svo lagdi ég allar blödrurnar í gamlan skókassa, snidugt ad hafa bökunarpappír í botninum á kassanum (dagblöd geta litad frá sér tegar límid er blautt). Til ad flýta fyrir turrkinum er svo alveg hægt ad blása á kúlurnar med hárblásara. Ég er yfirleitt mjög ótolinmód, en leyfdi kúlunum tó ad torna yfir nótt og passadi mig ad fara varlega tegar ég losadi frá blödrunni. Tad er hægt ad sjá hvort tær séu tilbúnar med tví ad pressa adeins á blödruna í gegnum eitt gatid, og ef hún losnar frá med smá brakhljódi, tá ætti ad vera óhætt ad sprengja og losa varlega frá.

How to:
It is pretty simple, as you can see on the photo-tutorial above. Start by preparing the glue, the yarn, scissors, and blow up the water-balloons. I cut the yarn in to pieces, c.a. 2-3 m. It is good to use disposable plastic gloves for this task, but if you use wallpaper-glue, it comes of really easy with just water and soap. I soaked each peace of yarn in the glue and then I continuously pulled it out of the glue-tray and irregularly wrapped around the balloons. Try to wrap it rather tightly around so it wont make too big gaps in between. After i wrapped around each balloon, I put them into an old shoe box, a good tip is to put baking paper in the bottom of the box, to prevent the balloons from sticking to the paper box (newspapers can emit color, when the glue is still wet). To accelerate the drying part it is possible to blow on the balls with a hairdryer. I am usually very impatient, but now I let the balloons stay drying over night, and was extra careful when I removed the balloons from the yarn. To see if they are ready and dry enough, you can press lightli on the balloon, and if it makes a cracking sound when it releases from the yarn it should be ready.

Ég notadi 20 ljósa seríu, og setti tvær perur saman í hverja kúlu/bolta, ég hafdi engin sérstök göt fyrir seríuna heldur fann ég bara hentugt gat einhversstadar til at stinga seríunni í.
.........................
I used LED-lights with 20 lights and made 10 balls so I put 2 lights in each ball, I did not make special gaps for the lights, i just found a gap/s that fitted.
Tad má einnig búa til annad med tessari adferd eins og t.d. jólatré.

Hér hanga kúlurnar/boltarnir eins og jólaskraut.


Hér eru jólatré, gerd med sömu adferd :)
Tá er hægt ad nota pappa og búa til "form" med tví ad snúa hann saman í kramarhús, eda hægt ad nota fraudplast mót sem fæst í föndurbúdum.
Tad tarf bara ad passa ad vefja nógu mikid utan um tegar gerd eru tré.
Endilega sendid á mig myndir ef þid prófid og ef þér líkadi pósturinn máttu endilega deila áfram.
Gledilegan desemberog munid ad fylgjast med því þad kemur nýtt DIY á hverjum degi fram ad jólum.

No comments:
Post a Comment